

Do you wish to add element to a picture, share some data, or have one other loopy concept that entails utilizing an interactive hotspot in electronic mail? This information ought to provide help to get the fundamentals into your HTML and CSS, so solely your creativeness will maintain you again!
E-mail Shopper Assist
To allow hotspots in your electronic mail design, you should utilize the CSS checkbox code that turns a bit of content material on and off. This additionally lets you management the place of a number of buttons on prime of a picture.
WebKit-based electronic mail purchasers solely help the CSS, so you will have to test which purchasers your viewers makes use of, in addition to guarantee a fallback is in place for purchasers that don’t help this progressive enhancement.
It is usually price occupied with how customers usually see an electronic mail – more often than not an electronic mail will not be interactive, so the subscriber isn’t anticipating an interactive component. So, we are going to add CSS animation to the buttons to deliver consideration to them.
Setting Up the Code
Earlier than we begin with the code, we have to arrange our content material. One background picture:

A picture for the buttons:

And eventually, all the photographs that may seem as soon as the subscriber clicks a button:
![]()
![]()
![]()
Now we will begin organising the code.
First, we first test whether or not the e-mail consumer helps checkboxes:
<model>
/* test for webkit */
@media solely display screen and (-webkit-min-device-pixel-ratio:0), (min--moz-device-pixel-ratio:0) {
#webkitnocheck:checked ~ .fallback {show:none;}
#webkitnocheck:checked ~ div .interactive {show:block !vital; max-height:none !vital;}
}

/* Examine for yahoo */
@media display screen yahoo {.fallback {show:block!vital;max-height:none;}
.interactive {show:none!vital;}
}

<!-- Samsung mail system detection -->
@media display screen and (-webkit-min-device-pixel-ratio: 0) {
#MessageViewBody .fallback, physique.MsgBody .fallback{show:block!vital;}
#MessageViewBody .interactive, physique.MsgBody .interactive {show:none !vital;}
#MessageViewBody .samsung {show:none !vital;}

/* Examine for gmail */
@media display screen and (max-width:9999px) {
u + .gmailbody .fallback {show:block!vital;max-height:none;}
u + .gmailbody .interactive {show:none!vital;}
</model>
We are going to add the category .fallback to the div containing our fallback and .interactive to the div surrounding our complete interactive part.
After this we will arrange the interactive space:
@media solely display screen and (-webkit-min-device-pixel-ratio:0), (min--moz-device-pixel-ratio:0) {
.space { place: relative; show: block !vital; overflow: hidden; max-width: 640px; max-height: 640px; width: 100vw; top: 100vw; background-image:url(pictures/leaf-bg.png); background-size:comprise; }
We have to create an space that’s relative to its environment to permit it to fit into an electronic mail wherever, in addition to add the background picture particulars. This contains:
Max-width: (most width of the picture)Max-height: (most top of the picture)- Setting the
width: 100vw - Setting the
top: 100vw
These parameters assist guarantee that on any display screen beneath the max-width, the picture is contained to the viewport width. As for the peak, the picture is sq. on this instance, so figuring out the peak relative to the viewport width was simple. However if in case you have an extended picture, you’ll be able to work this out by setting what share (%) the width of picture is in comparison with the peak (640).
Then, we set the picture utilizing background-image:url(hyperlink/picture.png) and the background measurement to be contained throughout the space we already set:
.leaf1, .leaf2, .leaf3 { visibility: seen!vital; show: block!vital; max-height: 50px!vital; place: absolute!vital; width: 50px; top: 50px; background-size: cowl; background-position:middle; -webkit-animation: pulse 2s ease 0s infinite; border-radius:25px; -webkit-box-shadow: 0px 0px 5px 5px rgba(50,50,50,0.5); cursor:pointer; background-image:url(pictures/hotspot.png);}
Creating the Hotspot Buttons
Now, let’s transfer on to the hotspots. We’ll set the hotspots’ picture, measurement, cursor, background-image, webkit-box-shadow and webkit-animation in a bit. First, you will get organized together with your completely different hotspot buttons.
When you’ve got completely different buttons, they will all be set with completely different names, however to make issues simple, including a quantity to the top will provide help to discover and management them.
/* Desktop button positions */
.leaf1 { left: 450px!vital; prime: 152px!vital;}
.leaf2 { left: 140px!vital; prime: 230px!vital;}
.leaf3 { left: 344px!vital; prime: 410px!vital;}
We will then set the place of the desktop buttons utilizing the left and prime positioning. The button’s place is absolute; the left and prime property set the left fringe of the button picture to the left fringe of its nearest positioned ancestor, and the highest fringe of the button picture to the highest fringe of its nearest positioned ancestor, which is the realm we set above.
Following this, we will set what occurs when the subscriber clicks the button:
#leaf1:checked ~ div #leaf1-content { show: block!vital; background-image:url(pictures/lamina.png)!vital; background-size: comprise; z-index:10; }
#leaf2:checked ~ div #leaf2-content { show: block!vital; background-image:url(pictures/veins.png) !vital; background-size: comprise; z-index:10; }
#leaf3:checked ~ div #leaf3-content { show: block!vital; background-image:url(pictures/midrib.png)!vital; background-size: comprise; z-index:10; }
With the code above, when a subscriber clicks the button with the identification #leaf1 – akin to our hotspot picture above with the category .leaf1 – the div that has the #leaf1-content will change its model from show:none; to show:block;. It’s going to additionally change its z-index and background-image set to indicate the label we created. We do that with a common selector ( ~ ) adopted by the div and the identification #leaf1-content.
#leaf1-content { place:absolute; left:375px; prime:170px; width: 200px; top: 40px;}
#leaf2-content { place:absolute; left:70px; prime:248px; width: 200px; top: 40px;}
#leaf3-content { place:absolute; left:270px; prime:425px; width: 200px; top: 40px;}
After organising how the content material seems, we have to place the content material. Utilizing the identical methodology because the button, we set the place: absolute together with the left and prime positioning. We additionally set the width and top of the content material.
Creating Animation for the Hotspot Buttons
As I discussed earlier, customers are nonetheless not used to seeing interactive parts in electronic mail. By highlighting the hotspot button with a pulsing animation, customers usually tend to click on or faucet.
/* keyframe animation - button pulse */
@-webkit-keyframes pulse { 0% { opacity: 0.7; -webkit-transform: scale(1); } 50% { opacity: 1; -webkit-transform: scale(1.2); } 100% { opacity: 0.7; -webkit-transform: scale(1); } }
Earlier than leaping in, I like to recommend trying out E-mail on Acid’s CSS animation information. However, to interrupt it down, we title the animation pulse, set the opacity and rising measurement utilizing -webkit-transform: scale, at 0%, 50% and 100%.
We then add the -webkit-animation: pulse 2s ease 0s infinite; to the buttons within the above part. This provides the animation to the component with the title pulse, lasting 2s, easing to 0s and persevering with infinitely.
Setting the Hotspot HTML
The above is the ultimate CSS for the desktop model of the hotspots on the picture. However earlier than we set the ultimate positions of the buttons and content material, we have to set how the hotspot picture HTML will seem in our electronic mail.
First, we arrange a desk to comprise the interactive module:
<desk function="presentation" width="640" model="width:640px;" border="0" align="middle" cellpadding="0" cellspacing="0" class="w100pc">
<tr>
<td valign="prime" align="middle" class="w100pc">

</td>
</tr>
</desk>
Arrange the desk as you’ll for any component inside an electronic mail. The desk and td surrounding the interactive picture has the class w100pc – setting them to 100% when on screens with a most width of 640px:
<model sort="textual content/css">
@media display screen and (max-device-width:640px), display screen and (max-width:640px) {
.w100pc {
width: 100%!vital;
min-width: 100%!vital;
max-width: 1000px!vital;
top: auto!vital;
}
}
</model>
Inside the desk we add the primary checkbox to see if the e-mail consumer helps this CSS:
<!--[if !mso]><!-- -->
<enter sort="checkbox" id="webkitnocheck" title="webkit" checked="checked" model="show:none;max-height:0;visibility:hidden;">
<!--<![endif]-->
We’ll wrap an enter in mso tags to cover it inside Outlook. Then, arrange the checkbox with id=”webkitnocheck” and title “webkit” we set the field to checked=”checked” and conceal the checkbox with model="show:none;max-height:0;visibility:hidden;". If an electronic mail consumer helps checkboxes, the interactive module will present, if not, the fallback will show.
Creating the Fallback
As a rule, I attempt to put the fallback first throughout the interactive module. If an electronic mail consumer masses the HTML within the order it’s coded, if the connection is sluggish, or if the code is lower off (for instance, hitting the Gmail 102kb restrict), then the fallback will show first and loading received’t be as sluggish in purchasers that don’t help the interactive component.
<div class="fallback">
<desk function="presentation" width="100%" border="0" cellspacing="0" cellpadding="0" align="middle">
<tr>
<td align="middle"><img src="https://www.emailonacid.com/weblog/article/email-development/how-to-create-interactive-hotspots-in-email/pictures/leaf-fallback.png" width="640" top="auto" alt="Leaf picture with labels." model="top: auto; show: block;" class="w100pc"/></td>
</tr>
</desk>
</div>
We set the fallback inside a desk as it can present on Outlook. You may set the fallback to be no matter you need – a full separate module or something that you just wish to exchange the interactive module.
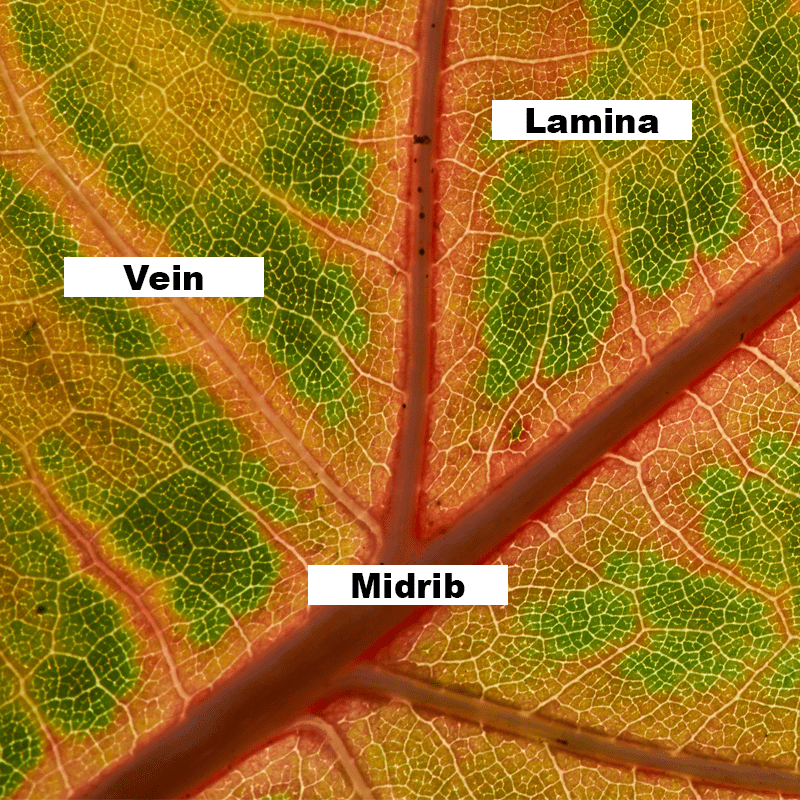
On this case I’ve included the entire picture with the labels, so any subscriber that may’t see the interactive module received’t miss out on the data:

The entire fallback content material is wrapped in a div with class=”fallback”, which will likely be hidden on electronic mail purchasers that help checkbox and proven on all others.
Concentrating on Samsung Mail
As a result of Samsung mail is detected individually, we’ll have to set a containing div with class="samsung". This surrouns our interactive part, adopted by <!--[if !mso]><!-- -->, which hides the part from Outlook.
Lastly, we wrap all of the content material with
<div class="interactive" model="mso-hide:all;show:none;max-height:0;overflow:hidden;">
The category “interactive” permits the interactive module to indicate to all electronic mail purchasers that help checkboxes, and the default model set to cover it from all different purchasers.
Subsequent, we line up the checkboxes for every button:
<enter sort="checkbox" class="leaf" id="leaf1" title="leaf" model="show:none;max-height:0;visibility:hidden;">
<enter sort="checkbox" class="leaf" id="leaf2" title="leaf" model="show:none;max-height:0;visibility:hidden;">
<enter sort="checkbox" class="leaf" id="leaf3" title="leaf" model="show:none;max-height:0;visibility:hidden;">
Every checkbox has the category leaf and ID for every leaf. The model is ready to cover all of the checkboxes, as we don’t need them seen.
After that, we’ll set u[ the interactive area, <div class="area"> so that it can contain the background image. Next, we add in each div containing the labels for the hotspots and we’ll give each label a class to match one of the hotspots:
<label class="leaf1" for="leaf1" style="display:none;max-height:0;visibility:hidden;"></label>
<label class="leaf2" for="leaf2" style="display:none;max-height:0;visibility:hidden;"></label>
<label class="leaf3" for="leaf3" style="display:none;max-height:0;visibility:hidden;"></label>
Within the interactive area, we add the div for each piece of content to appear when clicked:
<div id="leaf1-content"></div>
<div id="leaf2-content"></div>
<div id="leaf3-content"></div>
Finally, we close all the div and table tags to contain the interactive module and the containing table.
Setting Positions
Now that we have the hotspots all in the content area, as well as the background image and content, we can set the positions. This is often trial and error with a little bit of knowledge. For example, halfway across the image will be 320px – so, starting with that I can find the center of the image and work outwards, for both the hotspot buttons and the content.
We’ll need to set positions to a specific pixel position that will need to be responsive on mobile. Because of this, we’ll use a media query in a separate style tag to set the responsive position of the buttons and content:
<style>
@media screen and (max-device-width:640px), screen and (max-width:640px) {

/* Mobile content label positions vw - vh support is inconsistent on mobile */
#leaf1-content { position:absolute; left:60vw; top:23vw; width: 24vw; height: 5vw;}
#leaf2-content { position:absolute; left:15vw; top:39vw; width: 21vw; height: 4vw;}
#leaf3-content { position:absolute; left:40vw; top:68vw; width: 21vw; height: 4vw;}

/* Mobile button positions */
.leaf1 { left: 65vw!important; top: 21vw!important; }
.leaf2 { left: 20vw!important; top: 37vw!important; }
.leaf3 { left: 45vw!important; top: 66vw!important; }
}
</style>
This was also done with trial and error to set the correct positioning on screens below 640px.
The full code is all available on codepen.
Test your Interactive Hot Spots!
As with all interactive emails, it’s difficult to test in different email clients. But before sending to a range of live test devices we have at Action Rocket, using an email QA platform like Email on Acid can confirm whether the fallback and the interactive section are showing in the correct email clients. Check out the Email on Acid email previews of this technique.

Author: Jay Oram
Jay Oram is part of the design and code solutions team at the email specialist agency, ActionRocket. In his role at ActionRocket, Jay is usually experimenting with new code for emails or finding that elusive rendering fix. See more articles from Jay at emaildesignreview.com or find him on Twitter at @emailjay_.